Minimum System Requirements For Couter-Strike 1.6 Server:
- Internet Connection of Upload Speed 512 kB/s or Higher
- 1.5 Ghz Processor
- Windows XP, Vista, 7, 8 or 8.1
- 750Mb Disk Space
Step 1: Download SteamCMD from the official Valve website:
Step 2: Go to My Computer, then to C:/ and create a new folder called HLDS.
Step 3: Extract
steamcmd.zip, and copy
steamcmd.exe to
C:/HLDS. Right-click
steamcmd.exe and click
Run as Administrator and then click
Yes. Wait for a few seconds as SteamCMD updates to the latest version available. (Tip: If SteamCMD opens, and crashes abruptly, Open
Internet Explorer, click
Tools and then click
Internet Options. Navigate to the
Connections tab and click
Settings and check
Automatically Detect Settings. Click
Ok)
Step 4: Once the update is completed you will see “Steam>” in the last line in the command prompt window. Type “login anonymous” and hit the enter key. Once logged in, type “app_update 90 validate” and hit the enter key again. Wait for a few minutes as Counter Strike 1.6 Server files are downloaded from the Steam Servers. This should take about 15 – 40 minutes depending upon your Internet download speed.
Step 5: Steam has acknowledged that there is currently a bug with SteamCMD that causes it to report successful downloads even when the download has not been completed. You will notice that the download completed quickly, in the previous step. This indicates that the server did not download the files correctly. Therefore a workaround for this is to Close SteamCMD by typing “quit”, Download the following three files:
and place them in “C:\HLDS\steamapps” and then repeat Step 4. It is recommended to quit SteamCMD once more and repeat Step 4 to ensure all files are completely downloaded.
Step 6: Once you see “progress: 100” (or your HLDS folder size is about 751 MB), type “quit” in SteamCMD and hit the enter key. Download the Server Configuration files we have compiled for you:
These files will automatically install:
- Non-Steam
- AMX Mod X (Version 1.8.2)
- Metamod (Version 1.21)
- Dual Protocol 47 & 48 (For compatibility with all Counter Strike 1.6 versions)
Once downloaded, Right-click NonSteamAMXModXMetamodInstaller.exe and click Run as Administrator, and then click Yes. Click Browse and chose the cstrike folder for installation. In our case it will be “C:/HLDS/SteamApps/common/Half-Life/cstrike/” Click Install.
Step 7: Once the Server configuration files are installed, Go to “C:/HLDS/SteamApps/common/Half-Life/cstrike/” and open server.cfg and replace Server Name with any name, e.g: The Techno Geeks! CS Server. And Replace RCON Password with any password of your choice.
Step 8:CONGRATULATIONS!Server Installation Complete!
In order to switch on the server on, Right-click hlds.exe found in C:\HLDS\steamapps\common\Half-Life\ and choose Run as Administrator. Edit the Server Name and RCON Password (to match the one you set earlier in Step 5) and chose your map, click Start Server. On the first start, you will be asked to allow HLDS through the firewall, click Yes to ensure to HLDS is able to communicate on the network properly. (HLDS may suddenly close after this, simply open HLDS by double-clicking HLDS.exe, it will now function properly) (UPDATE: If your Server keeps on crashing, follow this tutorial for a fix:
Step 1: Download the
HLDSCrashFix.bat file and place it into the folder containing the
hlds.exe file of your Counter Strike Server.
Step 2: Run HLDSCrashFix.bat, a Command Prompt window will open that is now going to launch your Counter Strike Server in Console mode.
Step 3: Your Counter-Strike Server should now be functioning normally, if you do not find the Console mode comfortable you may close the Command Prompt window first and then type “quit” in the Console. Now run your Server using the hlds.exe file and your server should start without crashing.
The advantage of this method is that if you keep the Command Prompt window open, your Counter Strike Server will automatically re-start if it crashes. Hence this method is great if you keep your Server running unattended for long periods of time.
The Server Configuration files automatically installed
Amx Mod X 1.8.2 on your server. Amx Mod X is probably the best Server plugin out there that can help you manage maps, kick/slay/ban/gag players, pause/restart server, manage cvars and other useful elements right from the game.
Step 9: To Make the Server INTERNET BASED you will have to do
Port Forwarding, which means you will have to forward the Server Port through your router to the Internet, Port-Forwarding varies with every router, so
message the Router Model and Company of your router to our Facebook page (
Visit our Facebook Page HERE) or our Google+ page (
Visit our Google+ Page HERE) and I will help you out in no time! You can also use the comments section below.
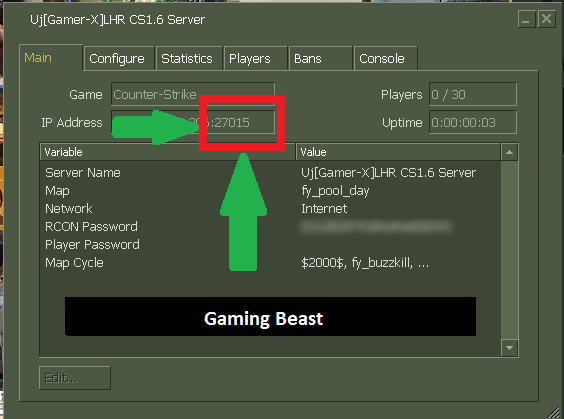
- Port you need to forward: 27015 (shown in Server Dashboard)
- Protocol: UDP
- IP Address: (Shown in Server Dashboard)
Step 10: Once you’ve port forwarded, it’s time to play with your friends, and this is exactly what you’ve been waiting for! Grab your Server’s IP address from
Google and grab your Server Port from the Server Dashboard: